This is a description and tutorial for how to set up a simple email support system in Gmail using cloudHQ’s free Gmail Label and Email Sharing Chrome extension.
Here’s how it works:
- You’ll create a single “support@company.com” email.
- Customers will be able to send messages to that email address.
- Your customer service reps will see any message that comes to support@company.com in their own Gmail accounts. They’ll be able to respond directly. They do not need to be logged into the support@company.com email to accomplish this.

Here’s how to set up the system for your support team:
1. Create a “support@company.com” email account
First, you need to create a support@company.com account in G Suite to receive your support inquiries.
We recommend making this account your “catch-all” email address for your G Suite domain.
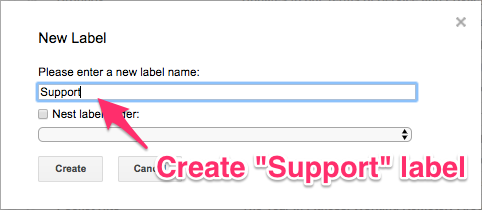
2. Create a “Support” label in Gmail
Next, log into Gmail with the support@company.com account and create a label called “Support”:
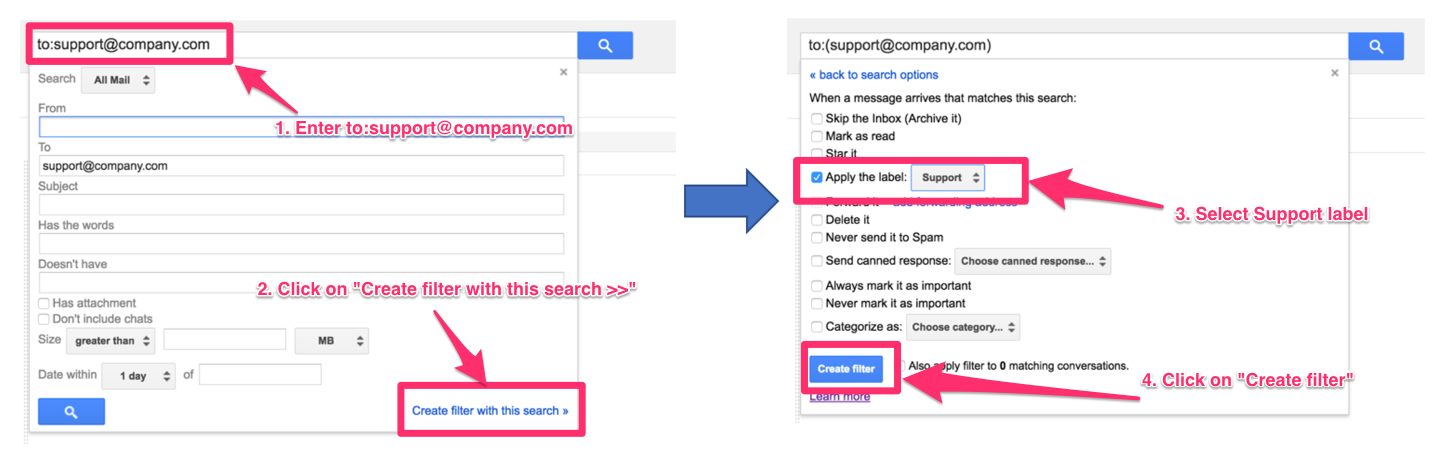
3. Create a Gmail filter
Next, create a filter so that all emails that come to support@company.com are labeled with the Support label:
4. Configure Gmail Settings for Support Team Members
For each team member who will be monitoring and answering support emails, you need to do two things:
- Enable conversation view
- Enable sending emails from support@company.com
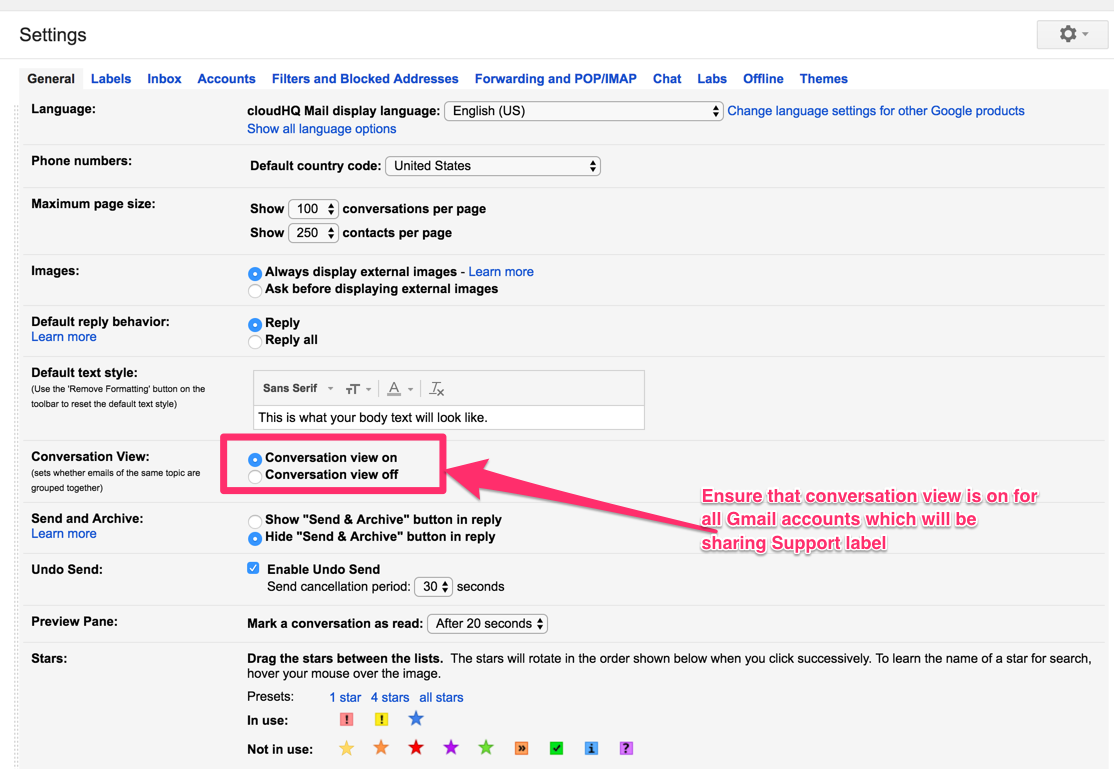
Enable conversation view
Each account needs to have Gmail “conversation view” enabled. This is because email conversations (also called “threads”) will be treated as “tickets” using this system.
Enable conversation view in settings under the “General” tab:
Enable sending emails from support@company.com
When enabled, each individual account can automatically send email as support@company.com when replying to an email that was sent to support@company.com.
Enable sending from support@company.com from settings under the “Accounts” tab:
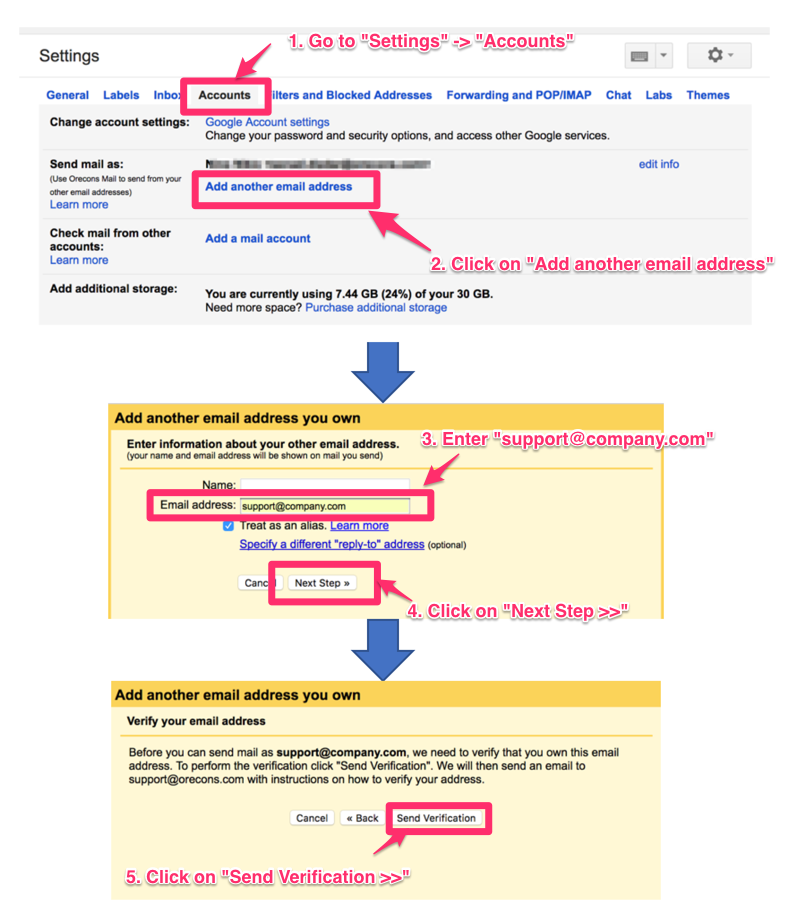
An email will be sent to support@company.com to authorize these users to send emails on behalf of support@company.com.
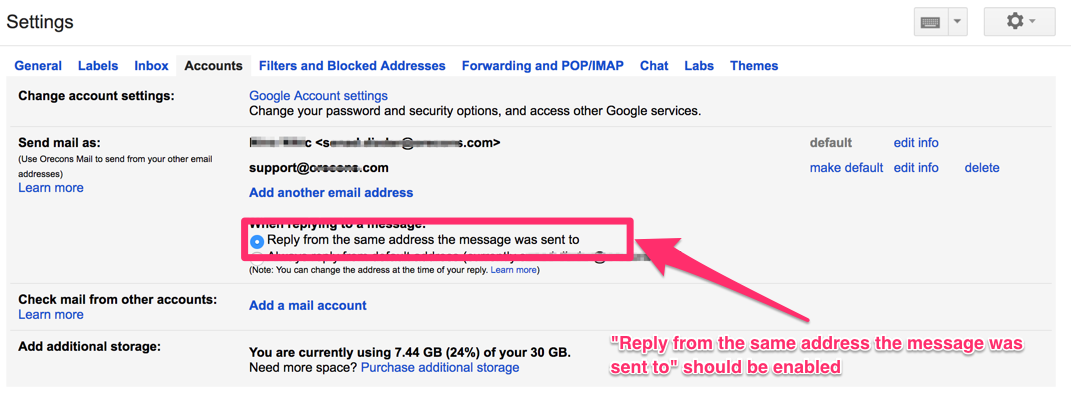
After authorization, check that “Reply from the same address the message was sent to” is enabled:
5. Set up Label Sharing Using cloudHQ
Share label support label with your team
- If you are super-admin of your domain you can set up everything directly from cloudHQ: How to set up a shared Gmail label for your Google Apps domain
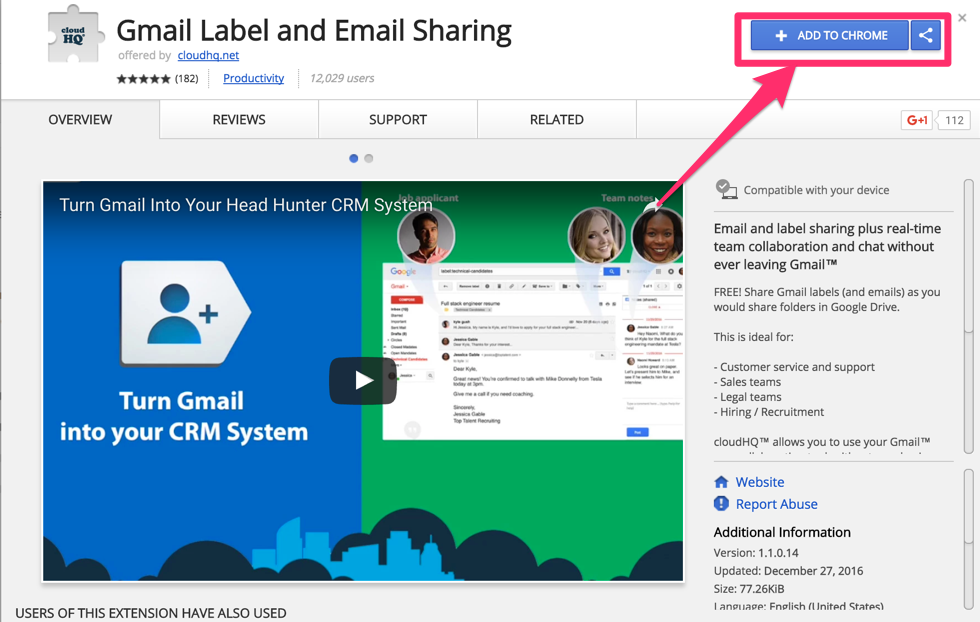
- Otherwise, log into Gmail as support@company.com, install the cloudHQ Gmail Label and Email Sharing Chrome extension, then share the Support label with your team: How to share a Gmail label
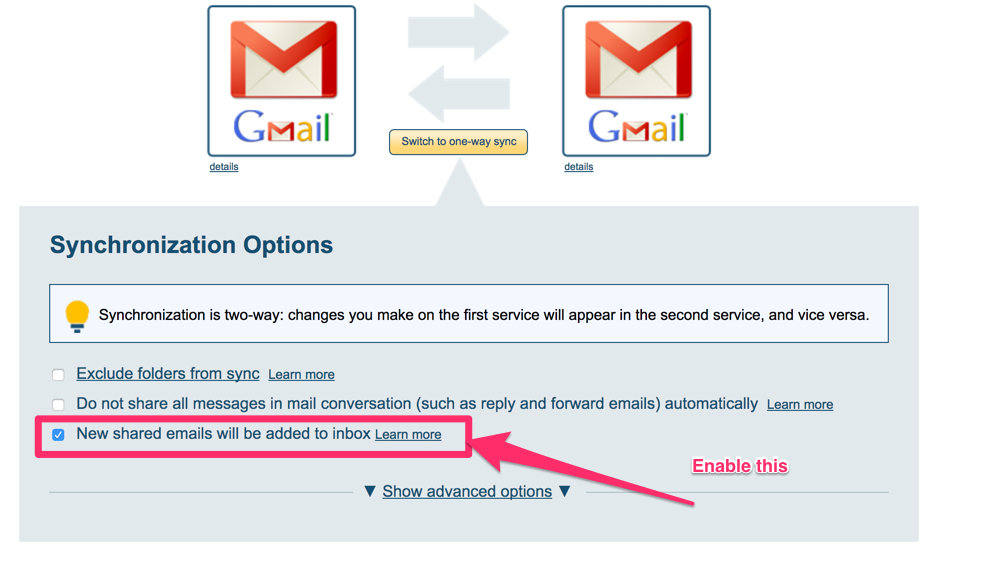
For each share, ensure that new shared emails will be added to support employee’s inboxes.
Optionally, you can have new emails to support@company.com marked as unread and placed in each user’s inbox:
Ensure each support employee has the label sharing extension installed
By sharing the Support label with your support team, all employees will receive an email to install the Gmail Label and Email Sharing extension.
When all your support employees have installed the Chrome extension and accepted the shared Support label, your support system is ready to use.
cloudHQ and Gmail Setup Overview
Here an overview of the technical setup of this system:
Workflow Overview
Here’s how support requests move through the system:
- All new emails to the support@company.com inbox will be seen by a team member with whom label is shared
- When an employee begins answering the email, the email will be marked as read to alert other employees that the email is being managed. If another employee begins composing a separate response email, the employee will see a popup message that the email is already being answered. The draft will be also replicated across all accounts with the shared label. All members will be able to see what the other support employee is writing.
- As soon as the email is answered, the email will be archived and marked as read in everyone’s inbox.
In this way, the email threads act like “support tickets” inside Gmail. If an email is in your inbox and unread, it means the email needs to be answered. If it’s marked as read or archived, another support employee is already working on the support request.
Using Statuses
When needed, any support employee can use “/status ” to change the status of an email thread using the chat box on the right side of the Gmail screen:
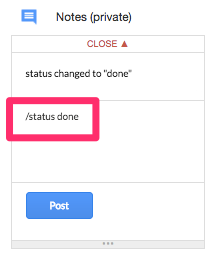
You can mark emails with predefined status:
- Done: the support ticket is answered. Type “/status done”.
- Waiting: waiting for customer to reply (you can set up snooze). Type: “/status waiting”.
- Bug: development is working on a solution. Type “/status bug”.
- Working: you are working on the ticket. Type “/status working”.
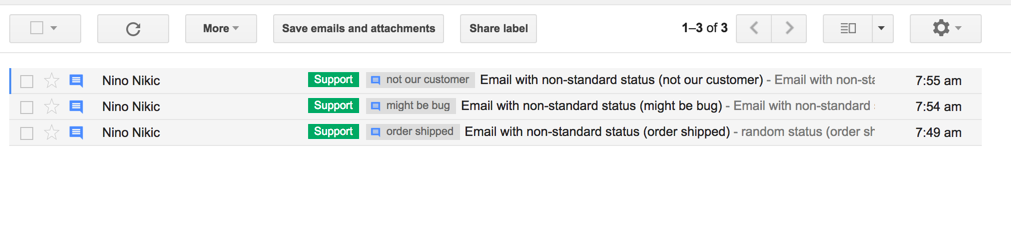
The above statuses will be shown in Gmail as follows:

You can also create additional predefined statuses. For example, you type “/status order shipped”. These statuses will be shown as follows:
Tips and Suggestions
Use Sublabels
Depending on the size and type of your business, it might be good to set up sublabels.
Sublabels are different from statuses because they should represent a permanent place for email threads.
Sublabels are classifications that will not change during the conversation. For example, sublabels could be a customer name, a support issue type (account, product, etc.), etc.
Rename subjects for easier search
Customers might send emails with subject lines that are confusing. We suggest using the “rename subject” feature to rename subject of emails.
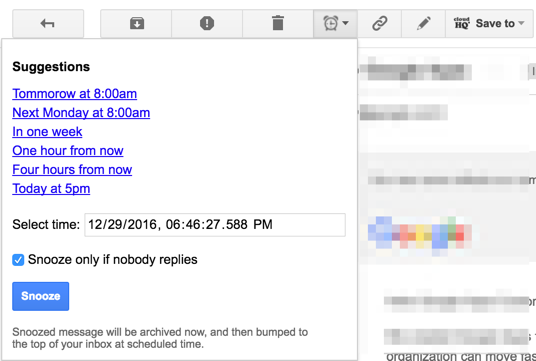
Snooze to remind yourself to follow up
You can use the “snooze email” functionality to remind yourself to follow up or check the status of tickets in progress. To do this, click the clock in the upper toolbar:
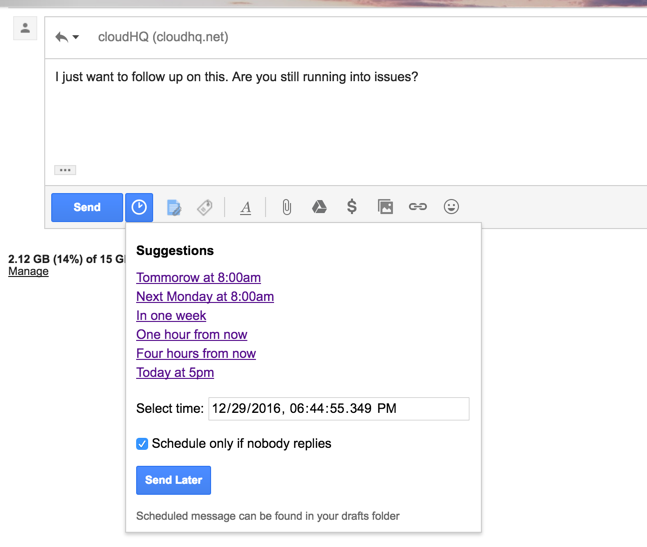
Schedule follow up emails
You can use the “schedule email” functionality to schedule emails.
For example, you can schedule a follow-up email and specify “Schedule only if nobody replies”. This will ensure the email is sent only if the customer does not reply back: